Upgrading your storage from a traditional SSD to an NVMe drive is one of the most effective ways to boost your system’s performance. NVMe drives offer significantly faster read/write speeds, lower latency, and better overall efficiency compared to SATA SSDs.

The best part? You don’t have to go through the hassle of reinstalling your operating system or applications. In this guide, we’ll walk you through everything you need to know to successfully clone SSD to NVMe.
What You Need to Clone SSD to NVMe
Before you start, ensure you have the following:
- An NVMe-compatible motherboard or laptop.
- The NVMe drive itself (ensure it has enough storage capacity to hold all your data).
- A screwdriver to install the NVMe drive (if required).
- For laptops, an external NVMe enclosure can be helpful for the cloning process.
Besides, you need reliable disk clone software. AOMEI Backupper is a powerful and user-friendly cloning tool that makes it easy to migrate your data from an SSD to an NVMe drive, which focuses on system backup and cloning. It’s a great choice for both beginners and advanced users. Here’s a breakdown of the key cloning options available in the software:
✅ System Clone: This feature allows you to clone your entire operating system to another drive. It’s perfect for migrating to a larger or faster SSD without reinstalling Windows or applications.
✅ Disk Clone: With Disk Clone, you can copy everything from one hard drive to another, including operating systems, applications, and personal data. This is useful for upgrading your storage or migrating to a new disk.
✅ Partition Clone: This option lets you copy one partition to another drive. It’s great for situations where you want to preserve specific data or files without affecting the entire disk.
✅ Sector-by-Sector Clone: This option clones every sector of the source disk, including unused and bad sectors. It’s a more thorough process, ensuring that even unallocated space is copied over, which is useful for recovering data from damaged or corrupted drives.
✅ Optimize for SSD: When cloning to an SSD, AOMEI Backupper can align partitions to ensure better performance and lifespan of the SSD.
✅ Support for MBR and GPT: AOMEI Backupper supports both MBR (Master Boot Record) and GPT (GUID Partition Table) partition styles, making it suitable for a wide range of systems, including UEFI-based ones.

Step-by-Step Guide to Clone SSD to NVMe
Now follow the instructions below to clone SSD to NVMe via AOMEI Backupper.
Step 1. Download AOMEI Backupper from the official website. Install the software on your computer.
Step 2. Connect your NVMe drive and ensure it is detected by your system.
- If you’re using a desktop, install the NVMe drive into the M.2 slot on your motherboard.
- For laptops, connect the NVMe drive using an external NVMe enclosure via USB.
Step 3. (Optional) If the target NVMe drive contains any data you don’t want to lose, backup files to another place using Windows backup software before proceeding.
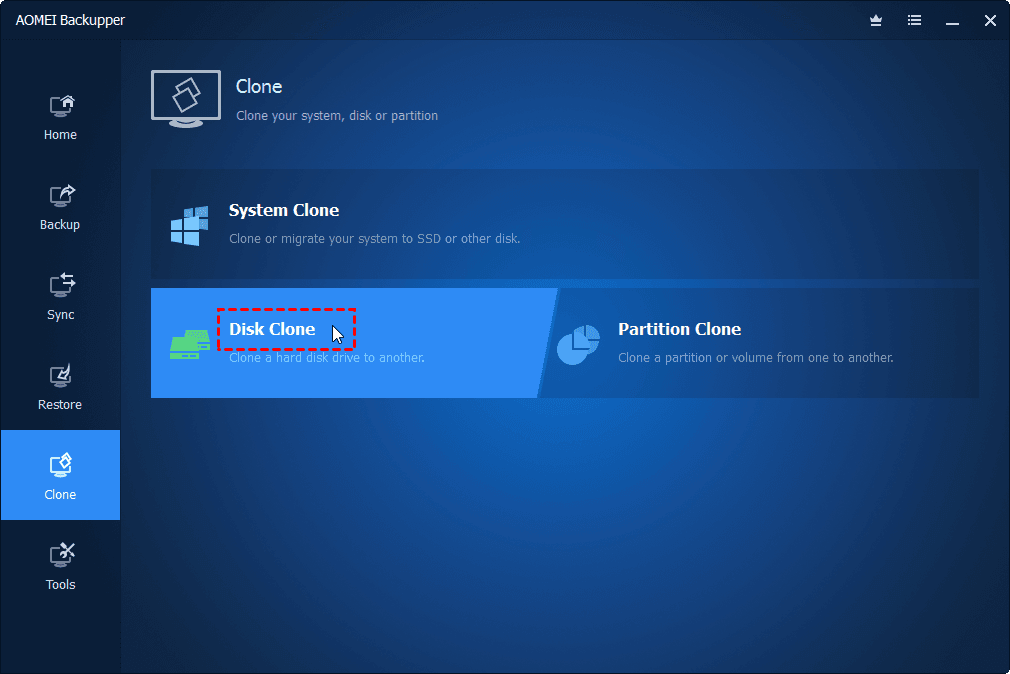
Step 4. Open AOMEI Backupper. Then click on the Clone tab on the left-hand side and choose Disk Clone to clone the entire SSD.
Step 5. AOMEI Backupper will display all the drives connected to your system. Select your current SSD as the source disk and click Next.
Step 6. Choose your NVMe drive as the target disk and click Next.
✍ Note: If the NVMe drive contains data, you’ll be prompted to erase it. Confirm to proceed.
Step 7. AOMEI Backupper will show a summary of the cloning process. Check the box for SSD Alignment to optimize performance on your NVMe drive, then click Start Clone. Depending on the size of your data, this may take some time.
Boot from the NVMe Drive
1. Once the cloning is complete, shut down your computer.
2. Restart and enter the BIOS/UEFI settings (usually by pressing F2, F10, or DEL during startup).
3. Locate the boot order settings and set the NVMe drive as the primary boot device.
4. Save changes and exit the BIOS. Your system should now boot from the NVMe drive.
✍ Note: If your NVMe drive is connected via an external enclosure before, you should install it inside your computer and then change the boot order to boot from it.
The End
Cloning your SSD to an NVMe drive is a straightforward process that can dramatically improve your system’s performance. With faster speeds, better efficiency, and seamless data migration, upgrading to an NVMe drive is a smart investment for both casual users and power users alike. By following this guide, you can confidently clone your SSD to an NVMe drive and enjoy the benefits of next-gen storage technology.