Why Need to Change BIOS to UEFI for Windows 11?
To run Windows 11, your system must use UEFI (Unified Extensible Firmware Interface) rather than the older BIOS (Basic Input/Output System).
Here are the key reasons why is necessary to change BIOS to UEFI:
1. Windows 11 System Requirements
Secure Boot is a UEFI feature that helps prevent unauthorized software from running during the boot process. Secure Boot ensures that only trusted operating systems and bootloaders can start, thereby increasing malware and rootkit protection.
2. UEFI Supports Larger Hard Drives
UEFI can handle larger drives (more than 2TB) and supports GPT (GUID Partition Table), which is essential for managing these larger drives. BIOS, on the other hand, employs MBR (Master Boot Record), which is limited to 2TB disk capacity and has further partitioning constraints.
3. Improved Security
UEFI features like Secure Boot, TPM 2.0 (Trusted Platform Module), and measured boot help to improve security. These capabilities assist protect against rootkits and malware, which might possibly take control of your system before Windows boots up.
4. No Support for Legacy BIOS in Windows 11
Windows 11 does not officially support installation on machines running the older BIOS system. This provides compatibility and efficient performance with modern computing standards.
To install and use Windows 11 smoothly, you must upgrade from BIOS to UEFI. This modification allows you to fully utilize security features such as Secure Boot, manage big storage devices, achieve faster boot times, and ensure future hardware and software compatibility.
How to change BIOS to UEFI without reinstalling Windows or losing data
Changing from BIOS to UEFI without reinstalling Windows or losing data is possible, but it requires careful steps. You’ll need to convert MBR to GPT disk partition style, which is compatible with UEFI. But normally, it is necessary to reinstall Windows for changing to UEFI mode.
If you feel confused about whether you can convert MBR to GPT without deleting data and switch Legacy to UEFI without reinstalling Windows. Luckily, there is a professional and free partition manager like AOMEI Partition Assistant, which taps into the disk potential and manages partitions efficiently, and allows you to convert the disk from MBR to GPT without deleting partitions or losing data in Windows 11/10/8/7. This way, you don’t need to spend time reinstalling Windows and all of your programs and lose all your data and settings for enabling UEFI boot mode.
Note: To avoid data loss caused by improper operation or some incidents like power failures, you can back up essential data beforehand.
Step 1. First, download and run this handy tool. Right-click on the system disk and select Convert to GPT or click the disk and choose Convert to GPT from the right column.
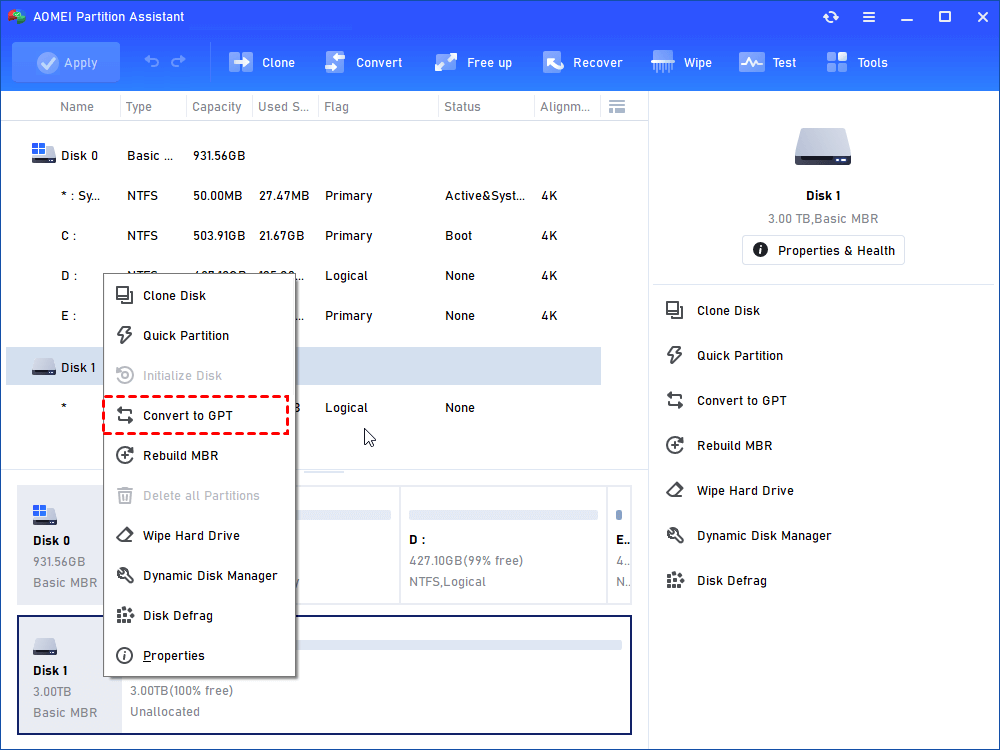
Step 2. Choose your OS disk and click “OK” to continue your operation.

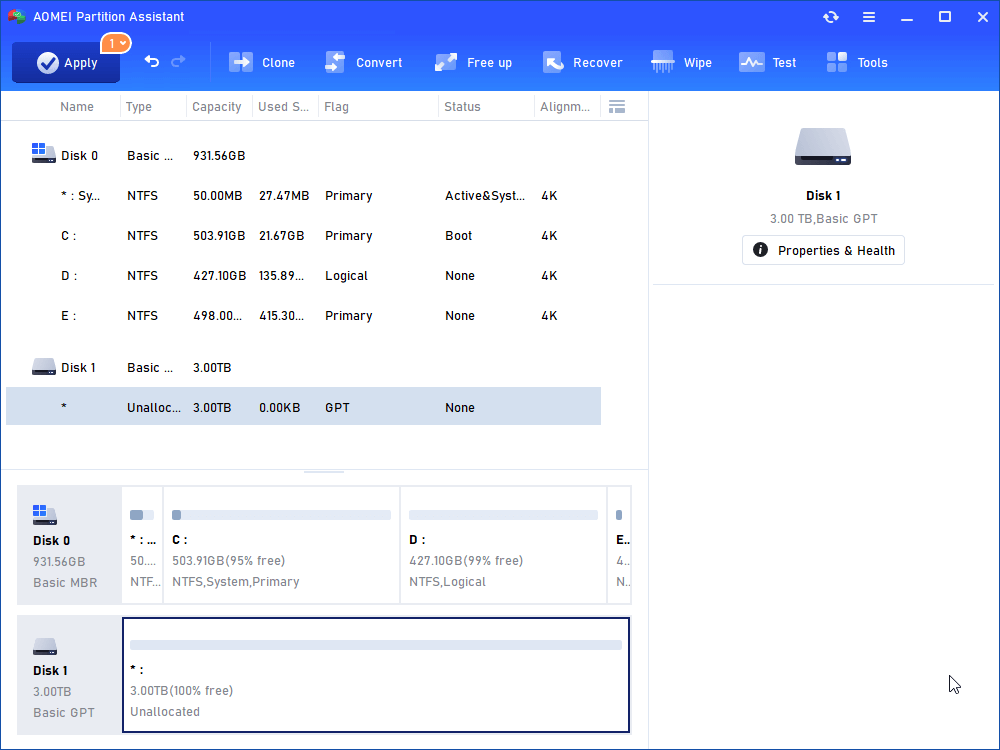
Step 3. Click “Apply” > “Proceed” to apply the change.
During the process, your computer will reboot into AOMEI Pre-OS mode. When it completes, you can follow the steps below to see how to change BIOS mode from legacy to UEFI Windows 11.
Step 1. When the computer starts up, you typically hit a certain key repeatedly to access the EFI Setup menu. Normally, it is Del for desktop computers and F2 for laptops. If you’re not sure which key to press, simply press Esc. It will display the whole menu, after which you may select BIOS Setup.
Step 2. Normally, you can find the Legacy/UEFI boot mode configuration on the Boot tab. On the Boot tab, deselect Legacy and enable UEFI.
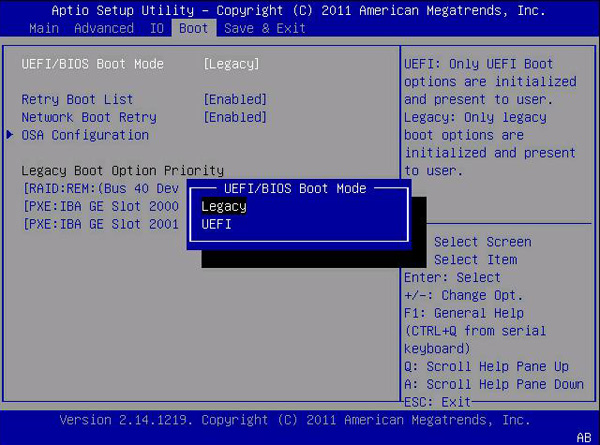
Step 3. Now, press F10 to save the settings and then exit.
Conclusion
Switching from BIOS to UEFI offers numerous benefits, from faster boot times to enhanced security and support for larger drives. While the process may seem daunting, you can successfully finish it using the partition software AOMEI Partition Assistant which follows the steps carefully, and preparing your system properly can help you know how to change BIOS to UEFI mode. As demonstrated, the process is quick and straightforward, and there’s no need to reinstall Windows 11, 10, 8, or 7.